jdbc:datasources" command and the newly created datasource will be listed.

This document describes how to create a Teradata JDBC driver datasource using the optional JDBC enterprise feature in Apache Karaf, which is one of several technologies in JBoss Fuse.
How to access a Teradata JDBC driver datasource via a Java servlet and deployment examples including an OSGi web application bundle (WAB) and a standard non-OSGi web application archive (WAR) are shown.
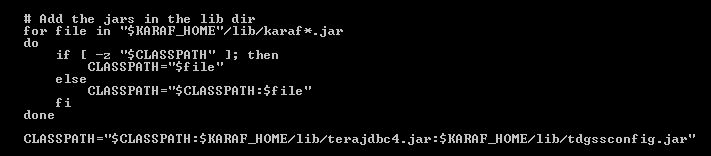
The Teradata JDBC Driver jar file(s) must be copied to your JBoss Fuse installation.
Beginning with Teradata JDBC Driver 16.20.00.11, copy file terajdbc4.jar
to the the JBossFuseInstallDir/lib directory.
With older versions of the Teradata JDBC Driver, copy files terajdbc4.jar and tdgssconfig.jar
to the the JBossFuseInstallDir/lib directory.
The Teradata JDBC Driver jar file(s) must be defined in the CLASSPATH in your JBoss Fuse installation.
Beginning with Teradata JDBC Driver 16.20.00.11,
edit karaf located in JBossFuseInstallDir/bin to include the following line:
CLASSPATH="$CLASSPATH:$KARAF_HOME/lib/terajdbc4.jar"
With older versions of the Teradata JDBC Driver,
edit karaf located in JBossFuseInstallDir/bin to include the following line:
CLASSPATH="$CLASSPATH:$KARAF_HOME/lib/terajdbc4.jar:$KARAF_HOME/lib/tdgssconfig.jar"For example (as shown for UNIX):
With JBoss Fuse started, the optional JDBC feature in Karaf needs to be installed.
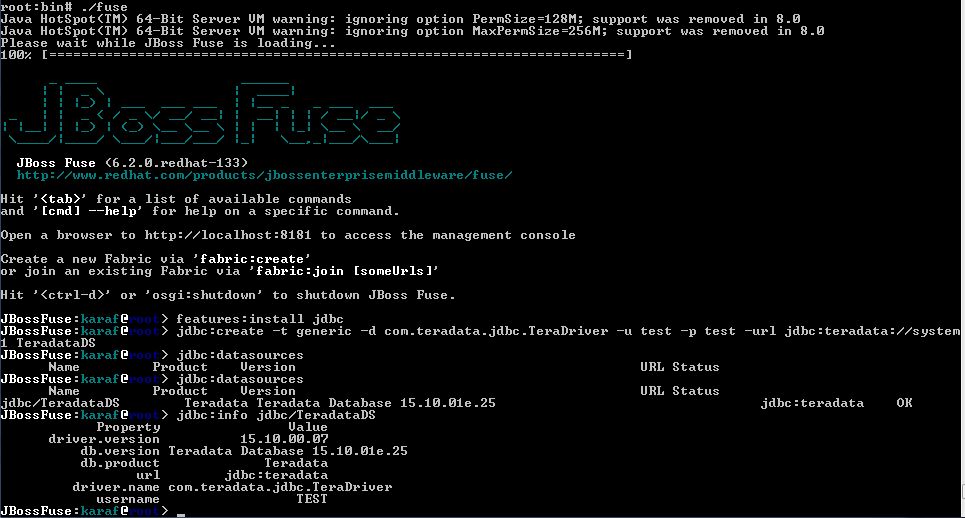
In the command console, enter "features:install jdbc".
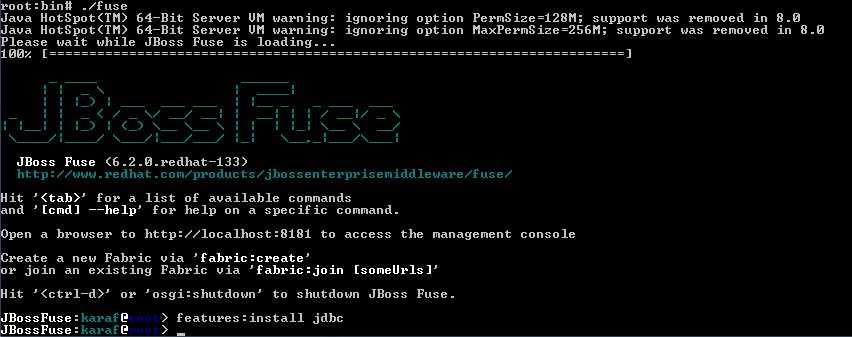
For further information on the jdbc feature, enter "help jdbc" in the command console.
The following table lists the parameters to create a datasource in Karaf.
Please note that the username "test" and password "test" are examples and should be replaced by the actual username/password combination for your database.
Field |
Value |
Example |
Type |
The JDBC datasource type | generic |
JDBC driver |
The classname of the JDBC driver | com.teradata.jdbc.TeraDriver |
Username |
The database username | test |
Password |
The database password | test |
URL |
The JDBC URL | jdbc:teradata://system1 |
Name |
The JDBC datasource name | TeradataDS |
The command to create a Teradata JDBC Driver datasource is as follows:
jdbc:create -t[type] -d[JDBC driver classname] -u[database username] -p[database password] -url[JDBC url] datasourcename
An example is shown below:
jdbc:create -t generic -d com.teradata.jdbc.TeraDriver -u test -p test -url jdbc:teradata://system1 TeradataDS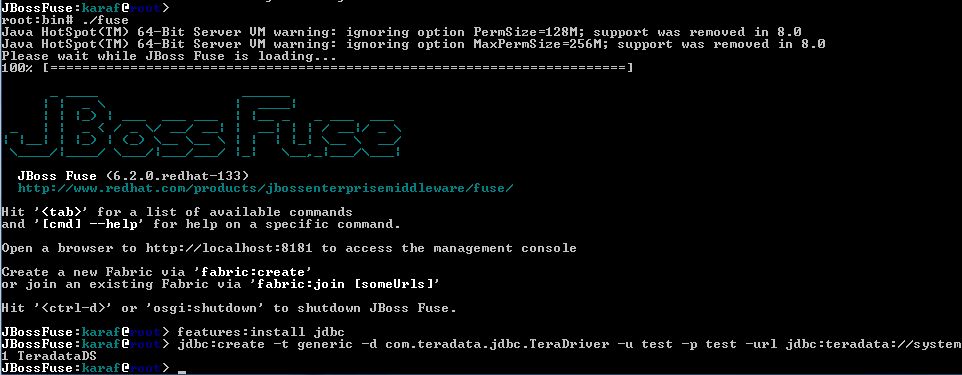
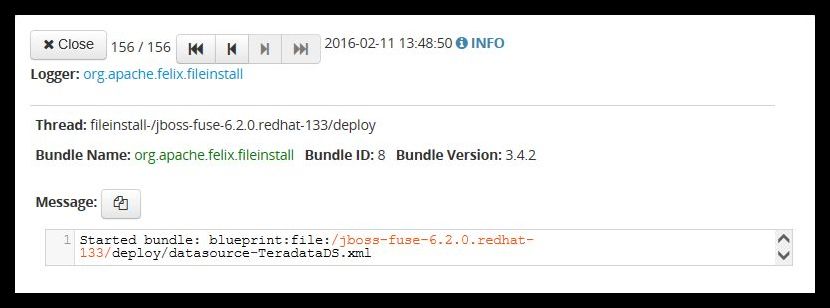
The "jdbc:create" command will create the datasource and generate a file named datasource-datasourcename.xml in theJBossFuseInstallDir/deploy directory.
To verify that the datasource was created successfully, enter the following command to list the JDBC datasources:
jdbc:datasources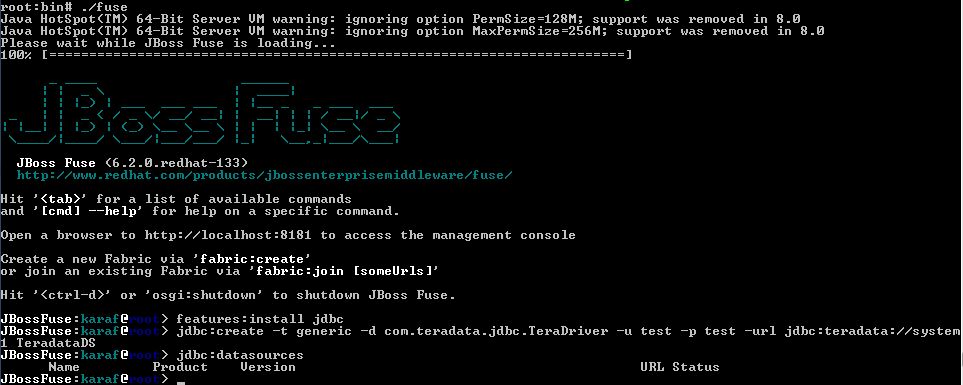
Due to a problem with the auto-generated xml file from the "jdbc:create" statement, no results will be returned showing the newly created datasource.
As a result, an error is shown in the JBoss Fuse log file such as:

NOTE: The log file can be viewed in the JBoss Fuse Management Console in a browser at http://localhost:8181 or in JBossFuseInstallDir/data/log.
To resolve the issue, the following modifications are needed in the JBossFuseInstallDir/deploy/datasource-datasourcename.xml file.
From |
To |
<property name="user" value="test"/> |
<property name="username" value="test"/> |
<argument value="WHEN_EXHAUSTED_BLOCK"/> |
<argument value="1"/> |
After these modifications are made, re-submit the "jdbc:datasources" command and the newly created datasource will be listed.
The log file will also show a successful creation:
The command "jdbc:info jdbc/TeradataDS" will provide further information about the datasource.
The database connection of the datasource can be tested using "jdbc:query".
Below is an example to send a query to the database:
jdbc:query jdbc/TeradataDS "select * from dbc.dbcinfo"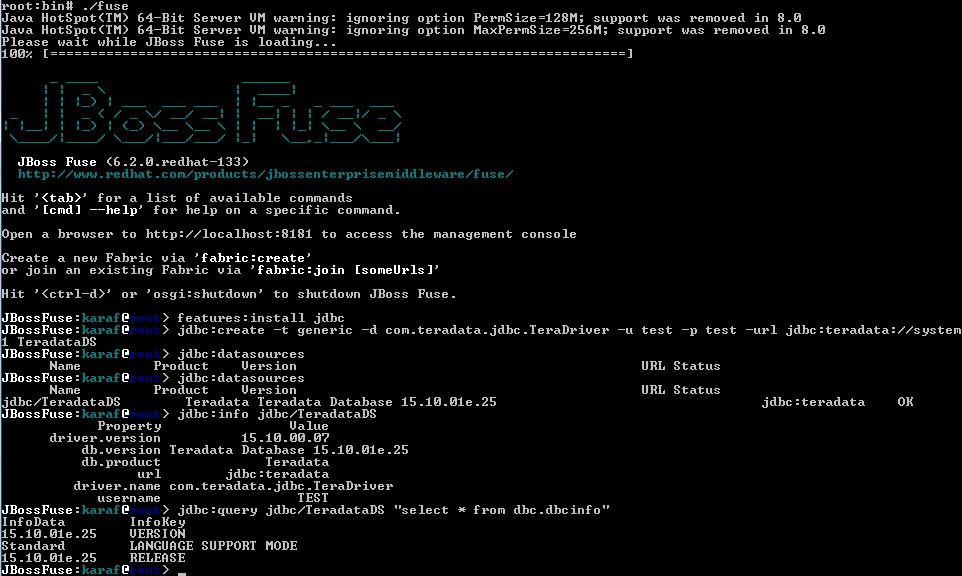
The JNDI and WAR features need to be installed as they are required for the following sections Using the Data Source and Deploy a WAR file using OSGi install and the war: prefix
The JNDI feature allows the use of a JNDI name to access an OSGi service. This is feature is described further in Using JNDI Service.
The WAR feature is required to convert and deploy WARs using the war: prefix.
With JBoss Fuse started, enter the following in the command console:
features:install jndifeatures:install war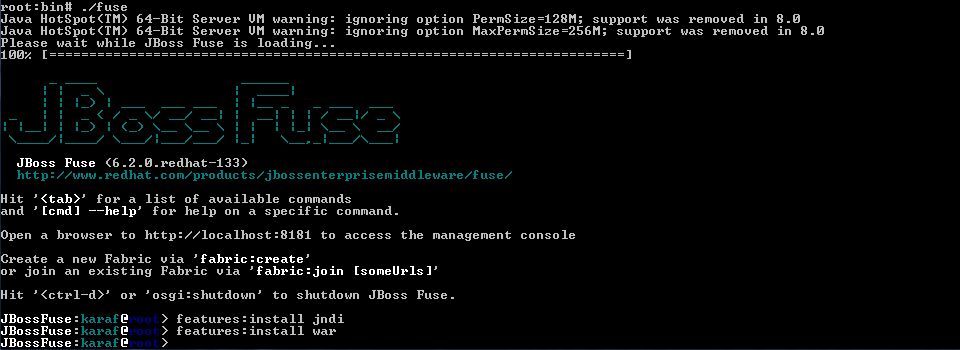
The Teradata JDBC Driver sample servlet "SampleJdbcServlet" will be used as an example in this section.
Complete sample servlets are listed here
A servlet is accessed via a URL similar to the following:
http://hostName:port/Web-ContextPath/servletname
The sample servlet "SampleJdbcServlet" is accessed with the datasource, user, and password specified in the URL as parameters.
http://localhost:8181/servlet/SampleJdbcServlet?datasource=osgi:service/jdbc/TeradataDS&user=test&password=test
NOTE: User-defined variables are in italics.
String user = req.getParameter("user");


String password = req.getParameter("password");


String datasource = req.getParameter("datasource");
The following code creates the initial context:
Context ctx = new InitialContext();
NOTE: Without the JNDI feature installed as described in Install the Karaf JNDI and WAR Features, an error will be returned when accessing a web application such as:
Looking up datasource osgi:service/jdbc/TeradataDS
*** Exception caught ***
javax.naming.NoInitialContextException: Need to specify class name in environment or system property, or as an applet parameter,
or in an application resource file
To perform a JNDI lookup to obtain the Data Source, the following code can be used:
DataSource ds = (DataSource) ctx.lookup(datasource);
To obtain a connection from the Data Source, the following code can be used:
Connection con = ds.getConnection(user, password);
At this point, the connection obtained behaves the same way as one obtained from the Driver Manager.
With the Karaf JNDI feature installed, a JNDI name can be used to access an OSGI service as an alternative to using the osgi:service scheme.
For example, these steps executed in the JBoss Fuse command console will create the JNDI name "jdbc/TeradataDS":
jndi:namesjndi:alias osgi:service/jdbc/TeradataDS jdbc/TeradataDS
jndi:names is submitted again to verify that the JNDI alias was created.
The datasource can now be access as either by the full osgi service scheme:
http://localhost:8181/servlet/SampleJdbcServlet?datasource=osgi:service/jdbc/TeradataDS
or by the alias:
http://localhost:8181/servlet/SampleJdbcServlet?datasource=jdbc/TeradataDS
The jndi:bind command can be used as well to bind an OSGI service to a JNDI name.
Please refer to the Apache Karaf documentation for further information.
There are several methods to deploy a web application (JSP/servlet) in JBoss Fuse.
Examples in this section include a OSGi web application bundle(WAB), a standard non-OSGi web application archive(WAR), and using OSGi install command
and the war:prefix.
In addition to the normal files for a servlet, a META-INF/MANIFEST.MF file
is required with these minimum OSGi manifest headers:
Header |
Example |
Description |
Bundle-ManifestVersion |
Defines that the bundle follows the rules of R4 specification | |
Bundle-SymbolicName |
SampleJdbcServlet | Unique non-localized name for the bundle |
NOTE: It is not necessary to specify the Web-ContextPath as JBoss Fuse will automatically create the Web-ContextPath.
Deploy the war file to JBoss Fuse by copying the WAR file to JBossFuseInstallDir/deploy. The servlet will be automatically deployed as a webbundle as shown in the table view for OSGi Bundles in the JBoss Fuse Management Console similar to:
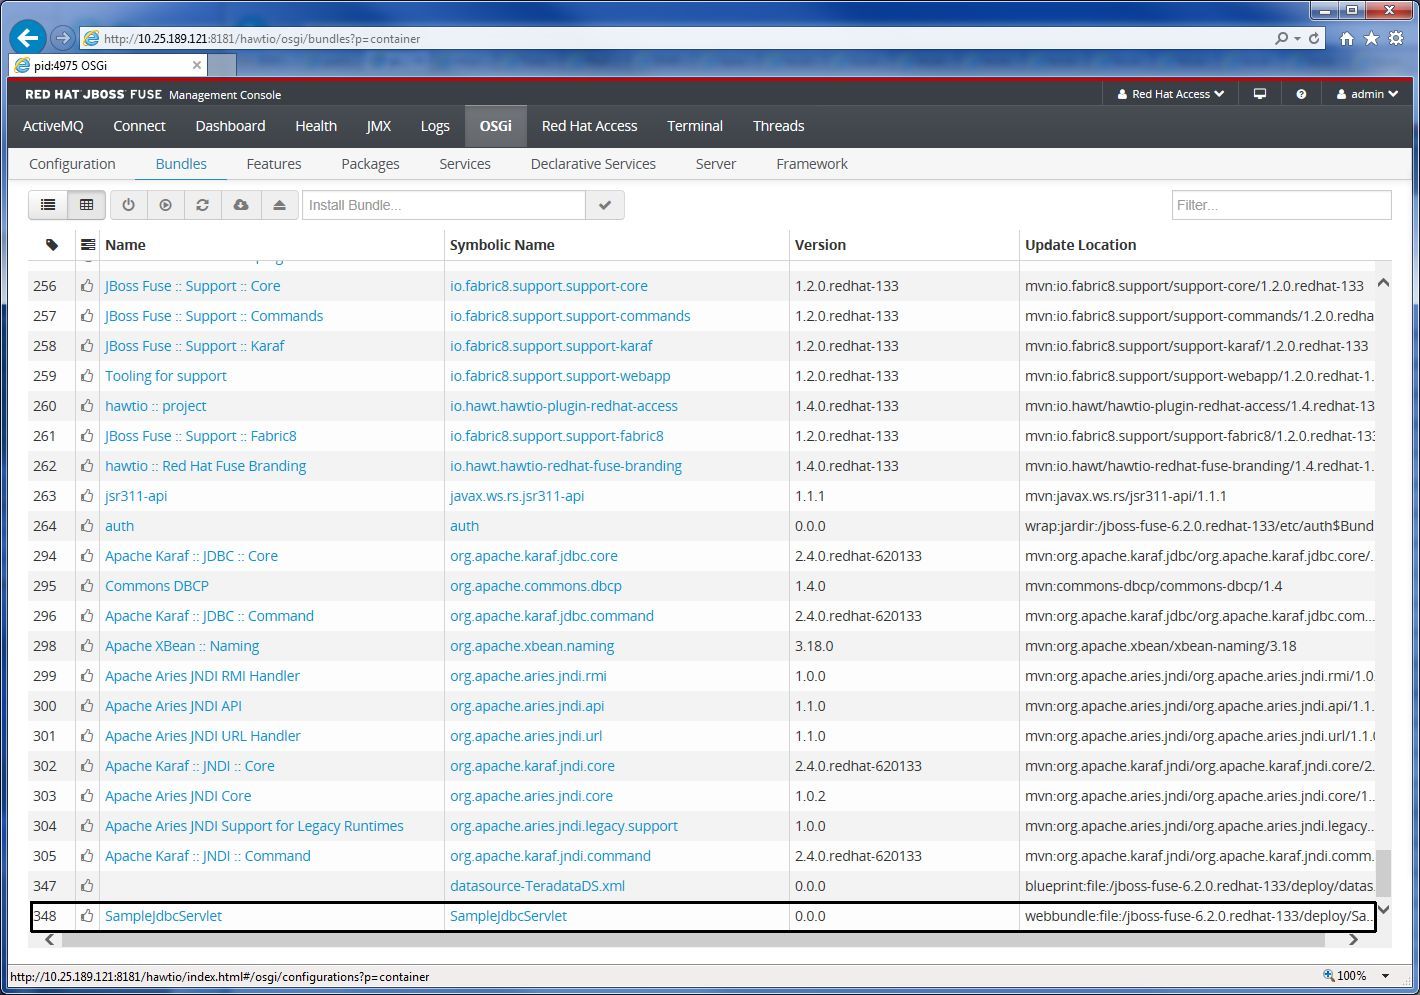
Click on "SampleJdbcServlet" in the Name column for more details on the bundle, including the Web-ContextPath.
A standard non-OSGi WAR file can be hot-deployed to JBoss Fuse by copying the WAR file to the JBossFuseInstallDir/deploy directory. The servlet will be started as a webbundle similar to an OSGi web application bundle(WAB) as shown for "SampleJdbcServlet" in the in the example above in Deploy an OSGi web application bundle (WAB).
A WAR file can be deployed to JBoss Fuse using the war: prefix when installing the web application in the JBoss Fuse
command console.
For example, to deploy a WAR file that is stored on the filesystem, enter the following in the JBoss Fuse command console:
install -s war:file:/servlet/SampleJdbcServlet/SampleJdbcServlet.war?Bundle-ManifestVersion=2&BundleSymbolicName=SampleJdbcServlet&Web-ContextPath=/SampleJdbcServlet
Deployment using the war: prefix in the install command, will display the WAR file in the JBoss Fuse Management Console
similar to:

Please refer to the Red Hat JBoss Fuse documentation for further information on the WAR Deployment Model.