Table of Contents
- Prerequisites
- Create an ASP.NET Core Web Application
- Install NuGet packages
- Create the Model
- Build the OData Entity Data Model
- Create the EFCore Database Context
- Set up the Connection String
- Register the Database Context and OData services
- Inline Model Data
- Build the Controller for OData
- Run and test the OData service
Prerequisites
To proceed further, you will need the following:
- A basic understanding of OData and EFCore concepts.
- An in-depth understanding of the features and limitations of the Teradata EFCore Provider.
- Visual Studio 2019.
- Microsoft.AspNetCore.OData version 8.0.1.
- Teradata.EntityFrameworkCore version 3.1.0.
- Teradata Database version 16.10 or later.
Create an ASP.NET Core Web Application
Start by creating a simple ASP.NET Core Web Application called BookStore.
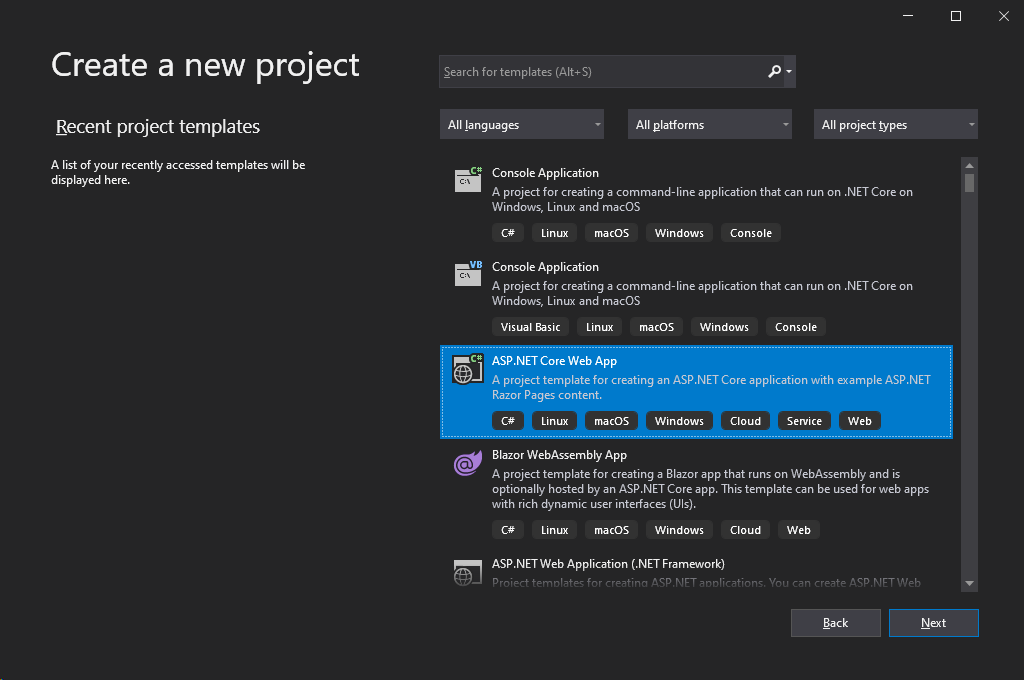
In Visual studio 2019, open the "New Project" dialog and select the "ASP.NET Core Web App" template:
Click "Next". Type in "BookStore" for the project name, provide the location, and click "Next".
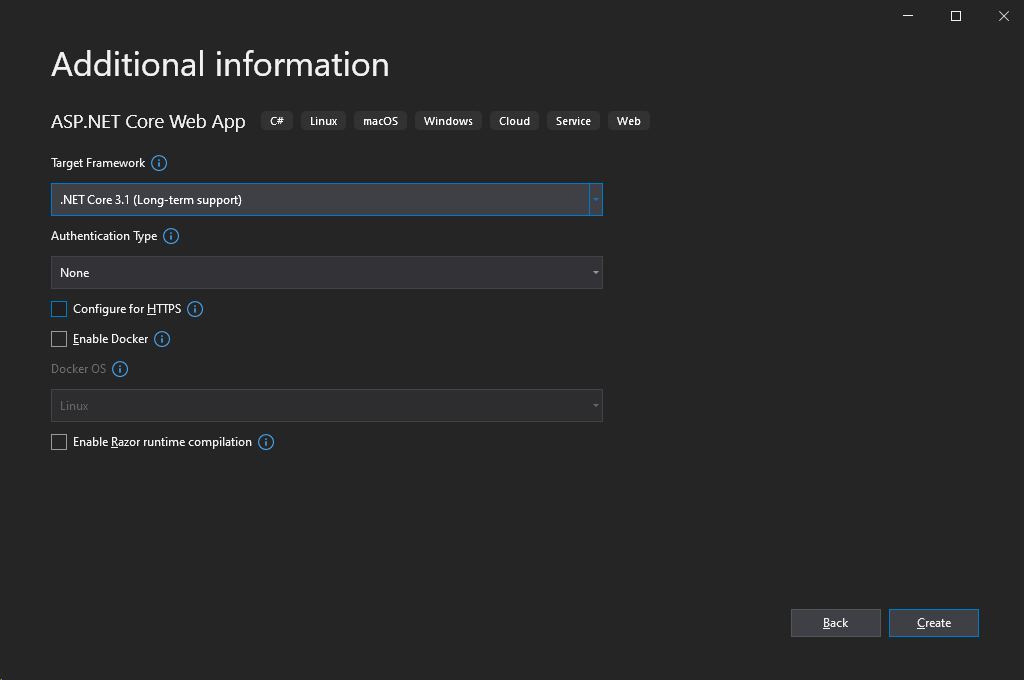
Select .NET Core 3.1 as the Target Framework, uncheck "Configure for HTTPS" for simplicity, then click "Create":
Install NuGet packages
Once the application is created from the template, install the following NuGet packages (instructions for installing packages may be found here):
- Microsoft.AspNetCore.OData version 8.0.1
- Teradata.EntityFrameworkCore version 3.1.0
The Teradata.EntityFrameworkCore package has a dependency on the Teradata.Client.Provider package, which will be resolved and installed automatically.
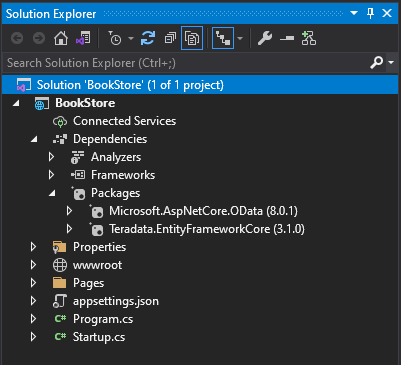
Once the packages are installed, the Solution Explorer window should look something like this:
and BookStore.csproj should have contain the following:
| BookStore.csproj |
Copy Code |
|---|---|
<Project Sdk="Microsoft.NET.Sdk.Web"> <PropertyGroup> <TargetFramework>netcoreapp3.1</TargetFramework> </PropertyGroup> <ItemGroup> <PackageReference Include="Microsoft.AspNetCore.OData" Version="8.0.1" /> <PackageReference Include="Teradata.EntityFrameworkCore" Version="3.1.0" /> </ItemGroup> </Project> | |
Create the Model
A model is an object representing the application data. Here we use POCO (Plain Old CLR Object) classes to represent the book store model. EFCore will map each such class (an Entity) to a table in a database.
Right click on the BookStore project in the Solution Explorer, select "Add" > "New Folder". Name the folder "Models". Add the classes below to the Models folder (for simplicity, we add all of them to a single file called AllModels.cs). Please note that some property types in the model classes must be annotated as described in features and limitations of the Teradata EFCore Provider. Here we annotate all the string types with a MaxLength Data Annotation attribute:
| AllModels.cs |
Copy Code |
|---|---|
using System.ComponentModel.DataAnnotations; namespace BookStore.Models { public class Book { public int Id { get; set; } [MaxLength(17)] public string ISBN { get; set; } [MaxLength(1024)] public string Title { get; set; } [MaxLength(1024)] public string Author { get; set; } public decimal Price { get; set; } public Address Location { get; set; } public Press Press { get; set; } } public class Press { public int Id { get; set; } [MaxLength(1024)] public string Name { get; set; } [MaxLength(1024)] public string Email { get; set; } public Category Category { get; set; } } public enum Category { Book, Magazine, EBook } public class Address { [MaxLength(1024)] public string City { get; set; } [MaxLength(1024)] public string Street { get; set; } } } | |
Build the OData Entity Data Model
OData uses the Entity Data Model (EDM) to describe the structure of data. To build the EDM in ASP.NET Core OData based on the above CLR types, add the following using statements to Startup.cs:
| Startup.cs using statements |
Copy Code |
|---|---|
using BookStore.Models; using Microsoft.OData.Edm; using Microsoft.OData.ModelBuilder; | |
and the following private static method to the "Startup" class in Startup.cs:
| GetEdmModel() |
Copy Code |
|---|---|
private static IEdmModel GetEdmModel() { ODataConventionModelBuilder builder = new ODataConventionModelBuilder(); builder.EntitySet<Book>("Books"); builder.EntitySet<Press>("Presses"); return builder.GetEdmModel(); } | |
Create the EFCore Database Context
In the Models folder, add a new class named "BookStoreContext" with the following contents. Note the TODO comment in the code.
| BookStoreContext.csproj |
Copy Code |
|---|---|
using Microsoft.EntityFrameworkCore; namespace BookStore.Models { public class BookStoreContext : DbContext { public BookStoreContext(DbContextOptions<BookStoreContext> options) : base(options) { } public DbSet<Book> Books { get; set; } public DbSet<Press> Presses { get; set; } protected override void OnModelCreating(ModelBuilder modelBuilder) { // TODO: Replace the PERM value with your own. // If the Default Database does not exist, EFCore will create it // using this and other supported Model annotations. See the // Teradata EFCore Provider documentation for more information. modelBuilder.ForTeradataUseStorageOptions("PERM = 1E7*(HASHAMP()+1)"); modelBuilder.Entity<Book>().OwnsOne(c => c.Location); } } } | |
Set up the Connection String
The Teradata EFCore Provider uses the .NET Data Provider for Teradata to establish connections to the Teradata SQL Engine. A connection string is required to establish the connection. For simplicity, we store the connection string in the project's appsettings.json file (click here for more information):
| appsettings.json ConnectionStrings |
Copy Code |
|---|---|
{
  ...
  "ConnectionStrings": {
    "TeradataConnectionString": "DataSource=MyTeradataDataSource;Database=MyUserId;UserId=MyUserId;Password=MyPassword;"
  }
  ...
} | |
Replace the connection string with your own while keeping in mind the following:
- The Database field is required by the Teradata EFCore Provider. It is the default database object name where EFCore will store the data. The default database is usually the same as the UserId.
- Consider the Connection Pooling feature of the .NET Data Provider for Teradata. Each OData request opens a connection to the Teradata SQL Engine, performs the operation, and closes the connection. Connection Pooling can have a significant impact on performance of opening and closing these connections, especially if the OData service is not in a close proximity to the Teradata SQL Engine.
- Consider using the TdConnectionStringBuilder class. For example (this requires more fields in appsettings.json):
TdConnectionString example Copy Codestring connectionString = new Teradata.Client.Provider.TdConnectionStringBuilder() { DataSource = Configuration["MyDataSource"], Database = Configuration["MyDefaultDatabase"], UserId = Configuration["MyUserId"], Password = Configuration["MyPassword"], // TODO: set any other Connection String properties }.ToString(); services.AddDbContext<BookStoreContext>(opt => opt.UseTeradata(connectionString));
Register the Database Context and OData services
To register the Database Context and OData services, add the following using statements to Startup.cs:
| Startup.cs using statements |
Copy Code |
|---|---|
using Microsoft.AspNetCore.OData; using Microsoft.EntityFrameworkCore; | |
Ensure that the Startup class contains the following:
| Startup constructor |
Copy Code |
|---|---|
public Startup(IConfiguration configuration) { Configuration = configuration; } public IConfiguration Configuration { get; } | |
Replace the ConfigureServices method in the Startup class with the following:
| ConfigureServices |
Copy Code |
|---|---|
public void ConfigureServices(IServiceCollection services) { services .AddDbContext<BookStoreContext>(opt => opt.UseTeradata(Configuration.GetConnectionString("TeradataConnectionString"))) .AddControllers().AddOData(opt => opt.AddRouteComponents(GetEdmModel()).EnableQueryFeatures()); } | |
Replace the endpoints.MapRzaorPages() call created by the template with endpoints.MapControllers() in the Configure method, which should now look like this:
| Configure |
Copy Code |
|---|---|
public void Configure(IApplicationBuilder app, IWebHostEnvironment env) { if (env.IsDevelopment()) { app.UseDeveloperExceptionPage(); } else { app.UseExceptionHandler("/Error"); } app.UseStaticFiles(); app.UseRouting(); app.UseAuthorization(); app.UseEndpoints(endpoints => { endpoints.MapControllers(); }); } | |
The EnableQueryFeatures() method above enables all OData query features, including $select, $expand, $orderby, and $filter.
Inline Model Data
Create a new DataSource class to contain an inline model data. This class will be used to initialize the data source with two books:
| DataSource.cs |
Copy Code |
|---|---|
using System.Collections.Generic; using BookStore.Models; namespace BookStore { public static class DataSource { private static IList<Book> _books { get; set; } public static IList<Book> GetBooks() { if (_books != null) { return _books; } _books = new List<Book>(); // book #1 Book book = new Book { Id = 1, ISBN = "978-0-321-87758-1", Title = "Essential C#5.0", Author = "Mark Michaelis", Price = 59.99m, Location = new Address { City = "Redmond", Street = "156TH AVE NE" }, Press = new Press { Id = 1, Name = "Addison-Wesley", Category = Category.Book } }; _books.Add(book); // book #2 book = new Book { Id = 2, ISBN = "063-6-920-02371-5", Title = "Enterprise Games", Author = "Michael Hugos", Price = 49.99m, Location = new Address { City = "Bellevue", Street = "Main ST" }, Press = new Press { Id = 2, Name = "O'Reilly", Category = Category.EBook, } }; _books.Add(book); return _books; } } } | |
Build the Controller for OData
Right click the BookStore project in Solution Explorer, select "Add" > "New Folder". Name the folder "Controllers". Add a BooksController class to the Controllers folder. Note the TODO comment in the code.
| BooksController.cs |
Copy Code |
|---|---|
using System.Linq; using BookStore.Models; using Microsoft.AspNetCore.Mvc; using Microsoft.AspNetCore.OData.Query; using Microsoft.AspNetCore.OData.Routing.Controllers; namespace BookStore.Controllers { public class BooksController : ODataController { private BookStoreContext _db; public BooksController(BookStoreContext context) { _db = context; // TODO: use EFCore Migrations or _db.Database.EnsureCreated() to create the database and tables _db.Database.EnsureCreated(); // populate the database if it's empty if (context.Books.Count() == 0) { foreach (var b in DataSource.GetBooks()) { context.Books.Add(b); context.Presses.Add(b.Press); } context.SaveChanges(); } } [EnableQuery] public IActionResult Get() { return Ok(_db.Books); } [EnableQuery] public IActionResult Get(int key) { return Ok(_db.Books.FirstOrDefault(c => c.Id == key)); } [EnableQuery] public IActionResult Post(/*[FromBody]*/ Book book) { _db.Books.Add(book); _db.SaveChanges(); return Created(book); } } } | |
Where:
- Get() returns all the books.
- Get(int key) returns one book with Id == key.
- Post(Book book) allows adding Books with the HTTP POST method. The [FromBody] attribute is commented out because we will use HTML form data, not JSON data, in the request.
Run and test the OData service
The OData service is ready to run and can provide basic functionality. Press "F5" to start debugging in Visual Studio. This will launch an instance of IIS Express and open the root web server directory in a new browser window. You should be able to retrieve data and metadata using the links below. Closing the browser window will stop the OData service and the Visual Studio debugger.
| OData Function | Service URL |
|---|---|
| Query the metadata: | http://localhost:5711/$metadata |
| Retrieve all the books: | http://localhost:5711/Books |
| Retrieve the book with id=2: | http://localhost:5711/Books(2) |
| Retrieve all books with prices < 50: | http://localhost:5711/Books?$filter=Price le 50 |
| Complex query: | http://localhost:5711/Books?$filter=Price le 50&$expand=Press($select=Name)&$select=ISBN |
| Add a book: | Remember to change the port number either in the project or in the HTML source code to make this work with your service. |
Click here to download the completed project.